I have always had a weakness for beautiful old leather bound books and expensive, hand-made Italian stationary of the sort sold by Il Papiro, but sadly these things have always been beyond the budget of a poor, lowly archaeologist. However, just after Christmas and finding myself at a loose end I grasped the nettle, so to speak, and decided to search out a bookbinding class.
My first venture into this field was at a workshop run by Phil Winskill at York Bookbinding. Phil runs tailor made one day courses and has a regular class once a week but I approached him for a couple of hours of private tuition and he kindly made space in his busy schedule to give me basic introduction.
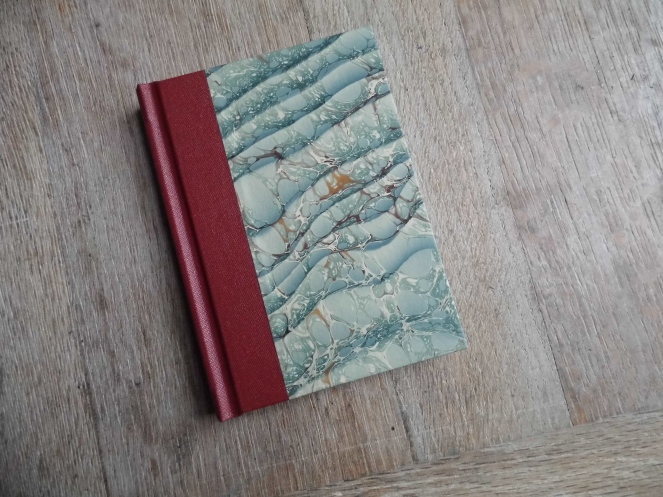
Phil’s class aims to produce a 6 section hand sewn notebook and I am inordinately proud of the end result.

I started by folding 3 sheets of blank cream A5 cartridge paper exactly in half to produce what is, in effect, a 12 page booklet and repeated this process 5 times. This produced a final book with 72 pages.
Next, each section had to be marked so that I knew exactly where to put the stitches as in the diagram.

I now had my six marked sections stacked with their spines facing me and I was ready to stitch the first one. It is not as easy as you might think trying to get the needle through from the inside of the sheet to skewer a pencil mark on the outside and it makes sense to pierce the holes first with an awl or something similar.
The style of stitching used to construct this book is known as “French Sewing” and is reassuringly easy to do, essentially just sewing in and out of the holes from right to left across the page as in the diagram.

Once at the end of the first block of pages the second is added on top and the sewing is repeated from left to right. However, at each external loop the needle is passed through to tie the upper section onto the section of pages below, binding them together. At the end of sewing up the second section of pages, the loose end of thread (ie. the none needle end) is tied off using a Reef Knot.
Each subsequent section of pages is added to the top of the pile of stitched sections and each is secured to the previous section using a Kettle Stitch.

When all of the page sections are neatly sewn together the end leaves are glued on. The end leaves are decorative leaves at the beginning and end of the book that secure the block of pages to the front and back covers.
In my case the end leaves were made from A5 sized red cartridge paper folded in half in the same way as the pages were made. A half centimetre wide stripe of PVA glue was applied along the fold of each end leaf using a scrap of paper as a mask to keep the glue in a neat, straight line. These were set aside for couple of minutes for the glue to cure and become tacky and then were stuck to the front and back of the block of pages along, and right up to the edge of the spine folds.
Next, end bands were cut to decorate the top and bottom of the spine. Both were cut to the exact width of the spine and glued on so that the decorative pattern extended over the end of the book.

The book was now ready to glue together. A generous amount of PVA glue was brushed onto the spine and worked into the gaps with a finger to get a good, even coating and the calico lining was applied before the book was set aside to dry.
While the block of pages was drying we turned our attention to making the cover. The cover was constructed from a front, back and spine board each cut from sturdy 2.5mm thick card, a spine cloth and decorative paper to cover the boards (in my case hand-made marbled paper.)
The spine board was glued centrally to the spine cloth and then the front and back pieces were attached to either side, making sure to allow for some flexibility when the cover is in the closed position. It is vital to ensure that all three pieces of card that make up the cover all line up and this is checked by laying the top edge of the cover against a ruler or other straight edge.


When the cover pieces were secured squarely, the excess cloth was folded in at the top and bottom of the cover and glued in place for neat finish. Next the decorative marbled paper panels were added to the front and rear covers and the whole thing was then put aside to dry.
When the glue on both the block of pages and the cover had dried the process of attaching the pages to the cover began. A layer of glue was applied to the front of the block of pages (i.e. the outside of the end leaf) and this was stuck down to inside cover of the book. After ensuring that the end leaf was stuck in nice and square to the inside of the cover the same process was repeated at the back of the book, making sure that the block of pages fitted tightly into the cover but that the spine of the book was not stuck to the spine of the cover.

The end result is a small, neat, usable notebook of which anybody can be proud.